Context Menu Operations
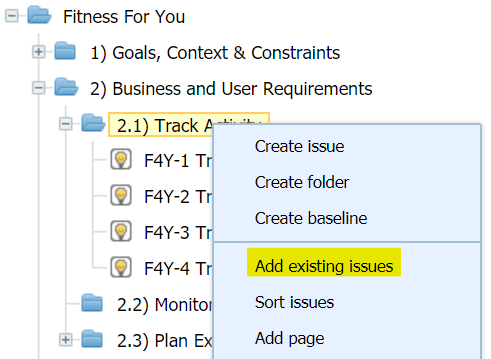
The project tree consists of folders, issues and references to pages in Confluence. To access the context menu, right-click on any item in the tree. Each type of item has its own set of context menu entries for performing appropriate operations, as indicated in the following tables.
Folder operations
Availability | |||
Root Folder | Other Folders | ||
✅ | ✅ | Create issue | Opens the Jira Create Issue dialog. Select Create to create the new requirement or issue and add it to the selected folder. |
✅ | ✅ | Create folder | Opens the create folder dialog, where you enter a name and a description for the new folder. The names of folders within one parent folder must be unique. Select Create to create the new folder below the selected one. |
✅ | ✅ | Create baseline | Opens the create baseline dialog, which allows you to enter a name and an optional description for the new baseline. Select Create to create a new baseline for the folder. |
✅ | ✅ | Add existing issues | Opens the Add Existing Issues dialog, where the following possibilities are available:
Select the option Run scheduled to enable automatic import based on the selected source. Due to the fact that issues may only appear once in a project’s tree, any issues that are already in the tree (in some other folder), are ignored, even if they match a filter or are manually selected to be added to a given folder. Only filters shared with the requirements project, or in the categories “My“, “Favorite“ or “Popular“, may be used when selecting a filter. Issues can only be added from activated projects. |
✅ | ✅ | Sort issues | Opens the sort issues dialog, where you choose the issue field to sort by, as well as the sort order. Issues can be sorted by issue key, creation date, issue summary, issue type or priority. Select Sort to perform the operation. This operation is disabled while the tree is still loading. Only issues directly contained in the selected folder are sorted. The sort order of Issues in subfolders as well as any child requirements is not affected. |
✅ | ✅ | Add page | Opens the add Confluence page dialog, allowing you to search for existing pages in any linked Confluence instance. This operation is only available if Confluence Integration is enabled. |
❌ | ✅ | Get URL | Creates a URL for the selected folder or requirement. Opening the URL in a browser displays the project tree with the folder or requirement preselected. |
✅ | ✅ | Refresh folder | Refreshes the folder's content and fetches any updates from the server. |
✅ | ✅ | Show in issue navigator | Opens the Jira issue navigator in a new browser tab or window. All issues contained in the selected folder and its subfolders are displayed by applying a search query using the JQL function requirementsPath, provided by R4J. |
✅ | ✅ | Expand | Expands the selected folder and all subfolders. |
✅ | ✅ | Collapse all | Collapses the selected folder and all subfolders. |
❌ | ✅ | Cut | Stages one or more folders or requirements for pasting within the same project or to a different project. |
✅ | ✅ | Copy | Stages one or more folders or requirements for copying within the same project or to a different project. If a filter is applied to the tree, only issues that satisfy the filter are included in the staged items. |
✅ | ✅ | Paste | Pastes staged items to the selected folder, as follows:
This operation is disabled while the tree is still loading. |
✅ | ✅ | Properties | Opens the edit folder dialog. Folders are just a special type of Jira issue, made available by R4J, and their fields are edited in the same way as for other types of issues (except that the name of the root folder cannot be changed). R4J enhances the edit dialog with a statistics section showing, for example, the number of issues in a folder. You can add an image to a folder by attaching it to the folder. To make it visible in the Reading View , add a link to the image in the description. Note that R4J only allows images to be attached to folders, not other types of files. |
❌ | ✅ | Delete | Opens the delete folder dialog. Removing folders from the tree removes all its subfolders and requirements recursively. They are not deleted in Jira and can be added again to the tree. |
Issue and page operations
Availability | |||
Issues | Pages | ||
✅ | ❌ | Edit issue | If the selection contains one issue the Jira Edit Issue dialog opens. If the selection contains multiple issues the Jira Bulk Edit dialog opens. |
✅ | ❌ | Create child issue | Opens the Jira Create Issue dialog. Select Create to create the new requirement or issue and add it as child of the selected requirement. |
✅ | ❌ | Create linked issue | Opens the Create Linked Issue dialog, which allows you to specify the the outgoing link type, as well as project in which the new issue should be created and the issue type of the new issue. Selecting Create opens the Jira Create Issue dialog, prefilled with the information entered in the dialog. Select Create to create a new issue of the chosen type in the chosen project, linked to the new issue with the chosen link type. |
✅ | ❌ | Add existing issues | Opens the Add Existing Issues dialog, where the following possibilities are available:
Select the option Run scheduled to enable automatic import based on the selected source. Due to the fact that issues may only appear once in a project’s tree, any issues that are already in the tree (in some other folder), are ignored, even if they match a filter or are manually selected to be added to a given folder. Only filters shared with the requirements project, or in the categories “My“, “Favorite“ or “Popular“, may be used when selecting a filter. |
✅ | ❌ | Add link | Opens the Add Link dialog, allowing you to add a Jira issue, Confluence page, or Web link for the issue selected. |
✅ | ❌ | Sort issues | Opens the sort issues dialog, where you choose the issue field to sort by, as well as the sort order. Issues can be sorted by issue key, creation date, issue summary, issue type or priority. Select Sort to perform the operation. This operation is disabled while the tree is still loading. Only issues directly contained in the selected issue are sorted. |
✅ | ❌ | Get URL | Creates a URL for the selected folder or requirement. Opening the URL in a browser displays the project tree with the folder or requirement preselected. |
❌ | ✅ | Open in Confluence | Opens the linked page in Confluence. |
✅ | ✅ | Cut | Stages one or more folders or requirements for pasting within the same project. |
✅ | ❌ | Copy | Stages one or more folders or requirements for copying within the same project or to a different project. If a filter is applied to the tree, only issues that satisfy the filter are included in the staged items. |
✅ | ❌ | Paste | Pastes staged items to the selected folder, as follows:
This operation is disabled while the tree is still loading. |
✅ | ✅ | Remove | Opens the remove issue/page dialog. Removing issues from the tree will remove all its child issues recursively. Issues will not be deleted in Jira and can be added again to the tree. |
Multiple select operations
Bulk Edit | Opens a new tab that redirects to the Jira Bulk Edit view. |
Cut | Stages one or more folders or requirements for pasting within the same project. |
Copy | Stages one or more folders or requirements for copying within the same project or to a different project. If a filter is applied to the tree, only issues that satisfy the filter are included in the staged items. |
Remove | Opens the remove items dialog to confirm removing items from the tree.
|
Requirements Reuse
R4J supports different forms of requirements reuse via the copy and paste operation.
Copy folders only: If you have a good folder structure in one project, or in part of a project, you can copy that structure to a different project or to a different part of the same project.
Copy folders and include issues: If you have some requirements in one project that are valid as is in other projects, you can include them in the other projects. Any folders in the selected items are copied to the target projects, but the requirements themselves are not copied, and changes in the requirements are immediately visible in the other projects.
Copy folders and issues: If you have some requirements in one project that are valid in other projects, or in a different folder of the same project, but may require subsequent changes independently of the original requirements, you can copy them to the other projects or within the project. The requirements are then separate from each other and changes in the original requirements are not reflected in the copied requirements.
Reuse issues dialog
When copied items are pasted, the Reuse Issues dialog appears, in which a choice between the different forms of requirements reuse is made and additional options are selected.
R4J administrators can create configurations of these options as Predefined Rules. If such rules have been defined, you may select one in the Reuse Issues dialog. Or you can instead select Manual Configuration.
After setting the options and selecting Paste, the Reuse Status appears. After the operation is finished the results are displayed. Error messages are shown in case of failures resulting from incompatible project configurations (e.g. a field selected for copying doesn’t exist in the target project).
The paste operation is executed in the background, so closing the dialog after confirmation does not cancel it.
Reuse options
Option | Description |
|---|---|
Create folders only | Select Yes to create folder structure without issues. |
Create new issues | Select Yes to copy the issues as new issues in the target project. This option is only enabled if the target is in a different project. |
Create links to new issues | Select Yes to create links are created in the source issues pointing to the copied issues. |
Fields to copy | The fields to be copied to the new issues are specified here. Mandatory fields (like the Summary field) are always copied. Due to the possibility of incompatible project configurations, care needs to be taken in selecting the fields to copy. To be successful, the selected fields must be in the View Screen of the source project and in the Create Screen of the target project. In the case of system fields with project specific values (e.g. Fix Version/s, Component/s), values missing in the target project are created but in the case of custom fields with project specific values, the copy operation fails. |
Copy attachments | Select Yes to copy attachments. |
Copy sub-tasks | Select Yes to copy sub-tasks. |
Copy directly linked issues | Select Yes to copy all issues with the specified link type to the target project. The issues will be created in the target project even if they are not included in the items that were selected. If the option “Add copied related items to target tree” is enabled, the copies of the issues linked to the source issues are placed in the target project tree. If the issues are in folders or issues that are also copied, the copies are placed there. If the issues are in folders or issues that are not copied, they are placed in the same folders as the source issues. If the option “Add copied related items to target tree” is not enabled, the issues linked to the source issues are simply copied to the target project, without being placed in the project tree. |
Copy child requirements | Select Yes to copy child requirements. |
Reuse restrictions
SELECTED items for reuse | Target is ISSUE | Target is FOLDER | Target is PAGE |
|---|---|---|---|
Issues | ✅ | ✅ | ❌ |
Folders | ❌ | ✅ | ❌ |
Pages | ❌ | ✅ (Cut&Paste only) | ❌ |
Issues and folders | ❌ | ✅ | ❌ |
Pages with issues and/or folders | ❌ | ❌ | ❌ |
Drag and Drop Operations
This operation is disabled while the tree is still loading.
The project tree supports the following drag and drop operations:
Change folder positions
Change the folder hierarchy
Change the position of requirements
Move requirements between folders
Create and remove child requirements
Change the order of child requirements
Move child requirements around the hierarchy
Tree Filter
To filter the issues in the project tree, select the Filter button just above the detail view and the following options appear immediately below the query:
Basic: Use predefined Jira filters. (Only Managed Filters from the following categories can be selected in the Filter picker: Filters shared with current requirements project, as well as filters in “My“, “Favorite“ or “Popular“.)
Advanced: Directly enter the desired JQL to use as filter.
After setting the filter, select the Search icon to apply the filter to the tree. To undo the filter, select Clear.
The current filter is reflected in the browser's URL for convenient sharing.
Tree Settings
To access the project tree settings dialog, click on the Settings button on the top right of the view. The following options are available:
Auto numbering for tree folders | Toggle to add automatic numbering to folders in the tree and the reading view. |
Show issue tooltips in tree | Toggle to show tooltips with issue information. |
Remember tree selection | Toggle to show the last viewed folder or issue when loading a project tree. |
The plugin version is also displayed in the Settings dialog.
Keyboard Shortcuts
Del: Opens the Remove Issue dialog for the item.
Shift + Del: Deletes an item without opening the Remove Issue dialog.
e: Edit an issue