| width | 70% |
|---|
In case you have not already created a Jira project, take a look at Jira Project Management for further information.
| width | 30% |
|---|
| Panel | ||||
|---|---|---|---|---|
On this page:
|
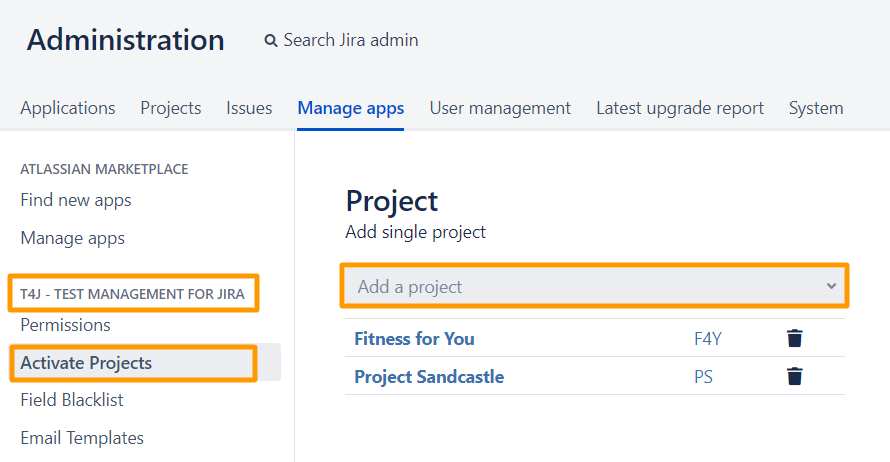
Project Activation
Enabling a project
- Login as Jira Administrator
- Choose
 > Add-ons
 - Select T4J - Test for Jira > Activate Projects from the sidebar
 Keyboard shortcut 'g' + 'g' + start typing 'Activate Projects'
 - In the Project section select a project from the dropdown menu to enable it for the use with the Test for Jira plugin.
Disabling a project
- Login as Jira Administrator
- Choose > Add-ons
- Select T4J -Test for Jira > Activate Projects from the sidebar Keyboard shortcut 'g' + 'g' + start typing 'Activate Projects'
- In the Projects section locate the project you wish to disable
- Click on the delete icon next to the project key to exclude it from T4J
use the T4J features, as an administrator, you must activate and enable the project by going to Manage apps > Activate Projects in the T4J section.
| Table of Contents | ||||
|---|---|---|---|---|
|
Operations
Purpose | Operation |
|---|---|
Activate Jira projects for T4J | Select a project from the Add a project dropdown in the Activate Projects to activate it. |
Deactivate a Jira project for T4J | Select the delete icon next to the name of the project you want to deactivate. The T4J data for a project is not deleted when the project is deactivated. The data is preserved and the project can be reactivated at any time. |